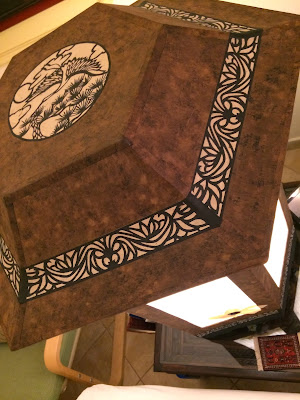
My latest project has been to make a large lamp but also to incorporate a few new techniques that I haven't used before. I spoke briefly about this in a previous blog but I'd just like to add some more details for those who may be interested in working on a project like this themselves.
Making the lamp was relatively easy as I just doubled the measurements of the large lamp instructions that I've already made up and added a few other details to strengthen the sides and improve the placement of the glass.
I'm restricted by the 70 x 100 cm dimensions of the cardboard I can get here but even still, that allows me to make something of a reasonable size.
The side panels were cut out of the 70 cm depth of the cardboard. I believe in some places you can get cardboard in larger sheets or custom made which I may need to look into in the future if I want to make anything too much larger.
The side panels were cut out of the 70 cm depth of the cardboard. I believe in some places you can get cardboard in larger sheets or custom made which I may need to look into in the future if I want to make anything too much larger.
The construction went together really well but then I needed to decide what I was going to do to decorate the lamp. This is often the most difficult part about making something as there are so many different coloured Hanji papers to choose from, a variety of patterns you can place on it and other things you could do to enhance it's beauty. I remember my Korean Hanji teacher telling me once that sometimes she takes up to a week to decide on what she's going to do.
 |
| Inspiration - Hanji Tea table and Coffee table |
In a project of this size I needed a lot of cardboard and paper so luckily I'd just received a new shipment of paper so I had a good supply of Hanji materials to choose from.
I used a black paper which was then bleached to get the mottled brown effect that looks like wood. You can buy this paper already bleached in Korea but unfortunately I didn't have any of that so I needed to make my own. It's sometimes frustrating that you can't replicate colours when using this technique due to the different composition of the Hanji paper and different batches tend to reveal various shades of brown but it certainly adds a uniqueness to every piece that I make.
Once the lamp was constructed and papered I wanted to try making flowers out of different layers of Hanji paper. As I mentioned before, I've only ever seen this done in Korea at OM's studio in Seoul and I wanted to try it for myself. After a lot of research and trialling of styles I made up a collection of flowers and placed them onto the lamp. The beauty of doing this is that when the light shines through the glass the different layers are revealed and the flowers take on a whole new dimension. I didn't want to overdo it so the placement of the right amount of flowers was important to me.
It was finished off with a border around the bottom of the lamp and the same design was duplicated on the lid so that it showed the connection between the two pieces. I then cut out a crane design to finish off the lid.
 The next challenge was to add the light fitting itself and as I wanted the light to radiate from the centre of the lamp and not just from the bottom, which would have given the lamp an uneven glow, I needed it to sit about halfway up. I eventually found a fitting that sits on a rod and is about 20 cms high. This is ideal and it radiates an even amount of light throughout the height of the lamp.
The finished lamp can be used as a floor lamp because of its size but as my floor space is limited I've put it on a small side table in my living room for now and it certainly makes a statement in the room.
This was a fun project which I hope to replicate and improve on in the future.


Comments
Post a Comment